Repairing refrigerator water line leak issues is crucial for maintaining the efficiency and longevity of your refrigerator. Addressing this problem promptly can prevent water damage, mold growth, and higher utility bills. This comprehensive guide will walk you through the steps to identify, diagnose, and repair refrigerator water line leaks, ensuring you have a properly functioning appliance.
Understanding Refrigerator Water Line Leaks
Common Causes of Water Line Leaks
Water line leaks in refrigerators can occur due to various reasons. Common causes include wear and tear over time, improper installation, and accidental damage during moves. Over time, the plastic or rubber tubing can deteriorate, leading to small cracks or holes. Additionally, incorrect installation can result in loose connections that eventually cause leaks.
Identifying Signs of a Leak
To effectively repair refrigerator water line leak issues, it is essential to recognize the signs early. Look for water puddles around the refrigerator, reduced ice production, and unusually high water bills. These indicators suggest that water is escaping from the line instead of reaching the ice maker or water dispenser.
Potential Consequences of Ignoring a Leak
Ignoring a water line leak can lead to significant problems. Water damage to floors and surrounding areas can be costly to repair. Prolonged moisture exposure can also lead to mold and mildew growth, posing health risks. Additionally, untreated leaks can escalate, resulting in more extensive repairs and increased expenses.
Preparing for the Repair
Gathering Necessary Tools and Materials
Before starting the repair, gather all necessary tools and materials. You will need wrenches, screwdrivers, replacement tubing, connectors, and safety gear such as gloves and safety glasses. Having everything ready ensures a smooth repair process without unnecessary interruptions.
Shutting Off the Water Supply
The first step in any repair is to shut off the water supply. Locate the water shut-off valve, usually found behind the refrigerator or under the sink. Turn it off to prevent water flow and ensure there is no risk of water damage while you work on the repair.
Emptying the Refrigerator and Freezer
Remove all food items from the refrigerator and freezer. Store them in a cooler or another refrigerator to keep them fresh. Unplug the refrigerator to ensure safety during the repair. Clearing the area allows for easy access to the water line and prevents food spoilage.
Diagnosing the Leak
Inspecting the Water Line
Begin by inspecting the water line for visible damage. Check common areas where leaks occur, such as near connections or bends in the tubing. Use a flashlight for better visibility. Identifying the exact location of the leak is crucial for an effective repair.
Testing the Water Line
To locate the leak, run water through the line and observe any signs of leakage. Mark the exact location of the leak once identified. Understanding whether the leak is a puncture, split, or loose connection helps determine the appropriate repair method.
Evaluating the Damage
Evaluate the extent of the damage to decide if a simple repair or a complete replacement is necessary. Consider the overall condition and age of the water line. If the line is old and has multiple weak spots, replacing it entirely might be more cost-effective in the long run.
Repairing the Water Line Leak
Temporary Fixes
For minor leaks, temporary fixes like using waterproof tape or sealant can be effective. While these solutions are not permanent, they can provide a quick remedy until a more thorough repair is possible. Use these methods only for small leaks and plan for a more permanent solution soon.
Replacing the Damaged Section
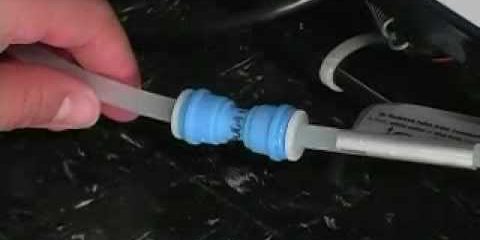
If the leak is in a specific section, cut out the damaged part of the water line. Measure and cut a new piece of tubing to replace the damaged section. Securely connect the new section using appropriate connectors, ensuring no leaks at the joints.
Installing a New Water Line
In cases where the entire water line needs replacement, remove the old line completely. Attach the new water line to the refrigerator, ensuring all connections are secure. Properly sealing the connections prevents future leaks and ensures efficient water flow.
Testing the Repair
Turning the Water Supply Back On
Gradually turn the water supply back on, monitoring for any immediate leaks. Check all connections and joints to ensure they are secure and there is no water escaping. A slow and careful approach helps in identifying any issues early.
Running the Refrigerator Water Dispenser
Run the water dispenser to flush out the new water line. This process helps remove any air pockets and ensures proper operation. Check for leaks during this step to confirm that the repair was successful and the system is functioning correctly.
Inspecting for Long-Term Leaks
Monitor the area around the refrigerator for the next few days. Look for any signs of moisture or leaks. Continuous monitoring ensures that the repair was successful and allows you to address any issues promptly before they cause significant damage.
Preventive Measures
Regular Inspections
Schedule regular inspections of the refrigerator water line to catch potential problems early. Look for signs of wear, loose connections, and any small leaks. Early detection can prevent major issues and prolong the life of your appliance.
Proper Installation Practices
Ensure proper installation practices are followed to prevent leaks. Secure all connections tightly and use high-quality materials. Follow manufacturer guidelines for installation to avoid common issues that can lead to leaks.
Tips for Moving Your Refrigerator
When moving your refrigerator, take precautions to prevent damage to the water line. Safely disconnect and reconnect the line, avoiding sharp bends and excessive force. Using protective measures during the move can prevent accidental damage and future leaks.
Common Mistakes to Avoid
Using Incorrect Tools or Materials
Using incorrect tools or substandard materials can exacerbate the problem. Ensure you have the right tools for the job and choose high-quality replacement parts. This approach ensures a durable and reliable repair.
Rushing the Repair Process
Take your time during the repair process to ensure accuracy. Rushing can lead to missed steps and incomplete repairs. Double-check each connection and test thoroughly to ensure the leak is fully resolved.
Ignoring Manufacturer Instructions
Always follow the refrigerator’s manual and manufacturer’s instructions. Each model may have specific guidelines for repairs. Ignoring these instructions can void warranties and lead to improper repairs.
When to Call a Professional
Signs You Need Expert Help
If the leak persists after your repair efforts, it’s time to call a professional. Persistent leaks, complex or hard-to-reach leaks, and a lack of necessary tools or experience are clear indicators that you need expert assistance.
Choosing the Right Technician
Find a certified refrigerator repair specialist with good reviews and recommendations. Compare quotes and services to ensure you get the best value for your money. A qualified technician can provide a reliable and long-lasting solution.
What to Expect from Professional Repair
Professional repair typically involves a thorough inspection, diagnosis, and repair of the leak. Understand the typical costs and timeframes involved. Professional service ensures the leak is properly addressed and prevents future issues.
Cost Considerations
DIY Repair Costs
DIY repairs can be cost-effective if done correctly. Costs include tools, replacement parts, and any safety gear needed. Compare these costs to professional services to determine the best option for your situation.
Professional Repair Costs
Professional repair costs vary based on the complexity of the leak and the rates of the technician. Typical charges include labor, materials, and service fees. Ensure you understand all costs upfront to avoid surprises.
Long-Term Savings
Investing in proper repairs and regular maintenance can save money in the long run. Preventing major leaks and water damage reduces repair costs and extends the lifespan of your refrigerator. Regular maintenance is a worthwhile investment.
Tools and Materials for Future Repairs
Essential Tools to Keep On Hand
Having essential tools like wrenches, screwdrivers, and tubing cutters on hand is important for any future repairs. Proper storage and maintenance of these tools ensure they are ready when needed. Investing in quality tools can make future repairs easier.
Spare Parts and Materials
Keep spare tubing and connectors for quick repairs. Source quality replacement parts from reputable suppliers to ensure compatibility with your refrigerator. Being prepared with spare parts can prevent prolonged downtime.
Building a DIY Repair Kit
Customize a DIY repair kit with all the necessary tools and materials. Ensure everything is in one place for easy access during repairs. A dedicated repair kit helps streamline the repair process and ensures you have everything you need.
FAQs
- What causes refrigerator water line leaks?
Common causes include wear and tear, improper installation, and damage during moving.
- How can I tell if my refrigerator water line is leaking?
Look for water puddles around the refrigerator, reduced ice production, and higher water bills.
- Can I repair a refrigerator water line leak myself?
Yes, with the right tools and instructions, many leaks can be repaired by homeowners.
- What tools do I need to repair a refrigerator water line leak?
Basic tools include wrenches, screwdrivers, replacement tubing, and connectors.
- How do I shut off the water supply to my refrigerator?
Locate the shut-off valve behind the refrigerator or under the sink and turn it off.
- What are the risks of ignoring a refrigerator water line leak?
Risks include water damage, mold growth, and increased repair costs over time.
- What should I do if my DIY repair doesn’t stop the leak?
If the leak persists, it’s best to call a professional technician for further assistance.
- How often should I inspect my refrigerator water line?
Regular inspections every six months can help detect early signs of damage.
- What should I consider when buying replacement parts?
Ensure compatibility with your refrigerator model and choose high-quality materials.
- When should I call a professional for a water line leak?
Call a professional if the leak is complex, hard to reach, or persists after DIY attempts.
Conclusion
To repair refrigerator water line leak issues efficiently, it’s crucial to follow the steps outlined in this guide. From identifying the leak to performing the repair and ensuring future prevention, each step plays a vital role in maintaining the functionality and longevity of your refrigerator. Whether you choose to tackle the repair yourself or call in a professional, addressing leaks promptly will save you time, money, and potential headaches down the line. Keep your refrigerator running smoothly and your kitchen free from water damage with these comprehensive tips and guidelines.


